sales06@switek.biz

+86 186 5927 5869

Shopping

Subscrib to Us
sales06@switek.biz
+86 186 5927 5869
Shopping
Subscrib to Us
Keywords:IML Robot; IML Robot Operating; In Mold Labeling Robotics
The screen of the pendant will show the current status of the IML robot. And the operating of the robot will also via the touch screen. Here in this chapter we'll introduce the function of the shotcut keys on the upper side of the screen and their operation.

| No | Name | Function |
|---|---|---|
| (1) | Current profile name | Click the name of the file currently in use to enter the file management page, and upload, download, read, save, overwrite, compare, and delete the file management. |
| (2) | Alarm display | If the alarm is currently in the alarm state, the icon is red, click to view the alarm details. |
| (3) | User level | The current user level is displayed, click to switch users 1/2/3/4 (Operator/technician/manager/highest level); and change the password of each user. |
| (4) | System time | Displays the current date and time. Click to modify the settings. |
| (5) | Speed display | Current manual speed/automatic speed display. Click to modify the speed. |
| (6) | Language display | The current system displays a language icon. Click to switch the screen display language. |
The following describes the operation of each function in detail.
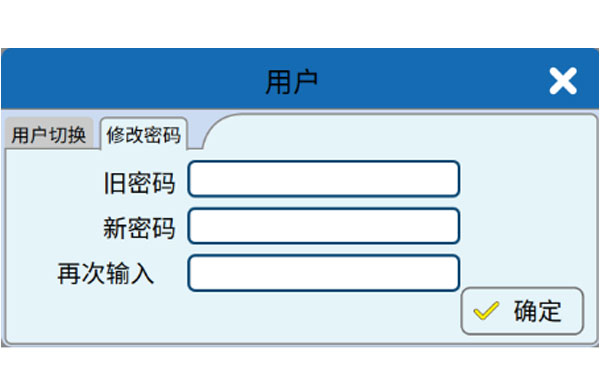
3.4.1 User Level Switching
Click  , the user switch page appears:
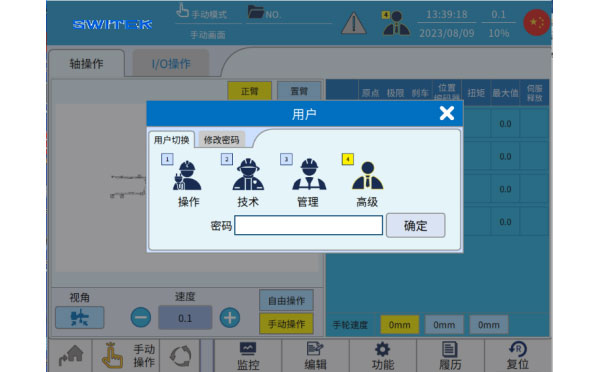
Select the user you want to switch, enter the password and click OK to complete the switch.
Different users have different permissions, and you can assign the operation permissions of each user in "Functions - Human Machiner Settings - User Settings".
In addition, you can select "Change Password" to change the password of the current user.
3.4.2 File Switching
Click  , the pop-up file management interface is as follows:
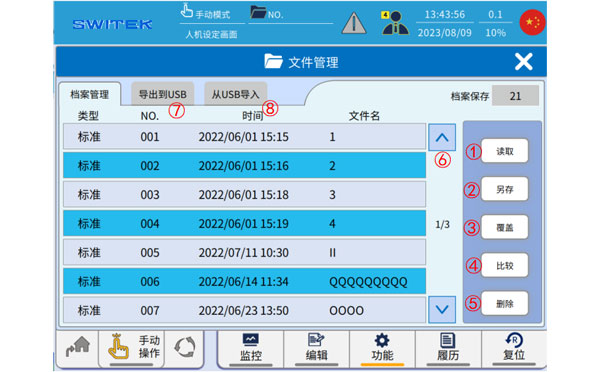
| No | Name | Function |
|---|---|---|
| (1) | Read | Click to select a file on the left (the selected file bar turns yellow). Click "Read" to confirm and start loading this file, and system data will be synchronized to the selected file. |
| (2) | Save | Click "Save" to set a new file number, file name, and file attributes, OK, the current system usage data will be backed up to a new file, and the new profile will be used as the current usage profile. |
| (3) | Cover | Click to select a file on the left (the selected file bar turns yellow). Click "Overwrite" to confirm that the current system data will be backed up to the selected file. |
| (4) | Compare | Click to select a file on the left (the selected file bar turns yellow). Click "Compare" to confirm, and the current usage data will be compared with the selected file, and the different items will be listed. |
| (5) | Delete | Click to select a file on the left (the selected file bar turns yellow). Click "Delete" to confirm that the selected file will be deleted. |
| (6) | Page | By scrolling up and down, you can view the backed-up files. |
| (7) | Export to USB | Download of data inside the system. |
| (8) | Import from USB | Read the backup of the system's internal data from USB. |
Export to USB:
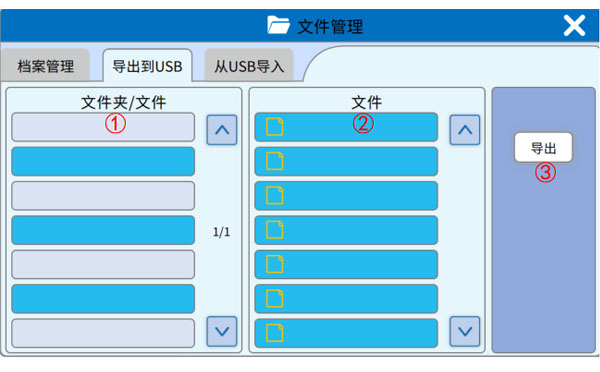
| No | Name | Function |
|---|---|---|
| (1) | Level 1 Catalog | Click to select a data in the controller (it will change to dark blue), and if the data is in folder form, the items in the folder will be listed in (2). |
| (2) | Level 2 Catalog | If the data selected in (1) is the form of a folder, then (2) displays the items in the folder, and you can click to select a single file. |
| (3) | Export | Perform an export job to USB for the files selected from the (1) and (2) lists. |
Import from USB:
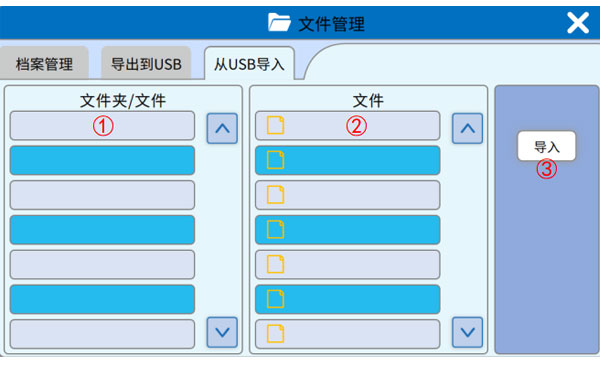
| No. | Name | Function |
|---|---|---|
| (1) | Level 1 Catalog | Click to select a data in the USB (select it to dark blue), if the data is in the form of a folder, the items in the folder will be listed in (2). |
| (2) | Level 2 Catalog | If the data selected in (1) is in the form of a folder, then (2) displays the items in the folder, and you can click to select a single file. |
| (3) | Import | For the files selected from (1) and (2) lists, the job of importing to the controller is executed. |
3.4.3 Alarm display
Click  icon, the pop-up alert display page is as follows:
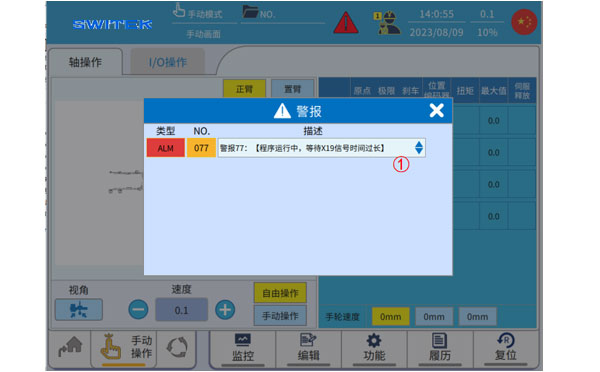
Click (1) to view the details of the alarm and how to deal with it, as shown in the following figure.

3.4.4 System time setting
Click 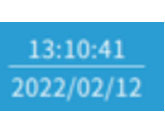 icon, the pop-up system time setting screen is as follows:

Click to set the current time of system.
3.4.5 Speed Setting
Click  icon, the pop-up system speed setting screen is as folows:
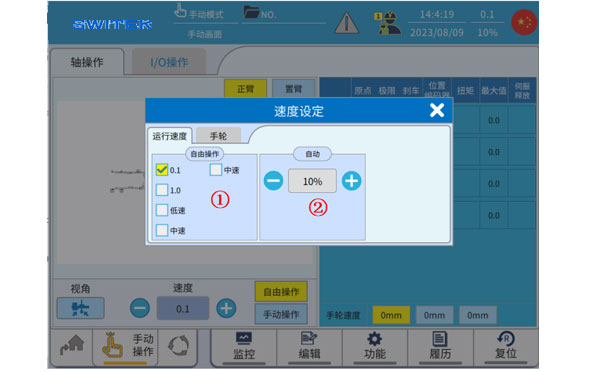
| No. | Name | Function |
|---|---|---|
| (1) | Manual speed | Click to switch the manual running speed, which is divided into five gears: 0.1/1.0/low/medium/high, note that you cannot use the 0.1/1.0 scale to move the shaft without returning to the original point. The speeds represented by "Low Speed", "Medium Speed", and "High Speed" can be set seperately in "Function-Mechanical Parameters-Mechanical Parameters" for "Free Operation (Low Speed)", "Free Operation (Medium Speed)", and "Free Operation (High Speed)". |
| (2) | Automatic speed | Click the button to switch the automatic speed (10%~100% of the maximum speed). |
3.4.6 Screen Language Setting
Click  icon, the pop-up language setting screen is as follows:
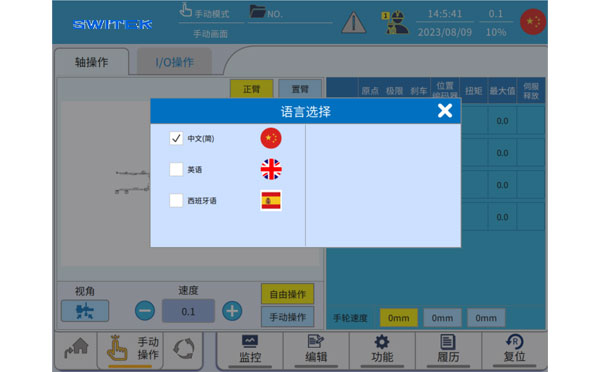
Click to switch between different languages


Contact SWITEK IML
sales06@switek.biz
+86 186 5927 5869

DongGuan, GuangDong, China
HuangYanZheng©Copy Right