sales06@switek.biz

+86 186 5927 5869

Shopping

Subscrib to Us
sales06@switek.biz
+86 186 5927 5869
Shopping
Subscrib to Us
The rutine check up and maintenance of the robotic arm will keep it in good condition and working safely. Here in this chapter you'll have a principal guideline of the maintenance of the robotic arm for injection molding automation.
According to the nature of maintenace operations, it can be divided into: cleaning, inspection, tightening, adjustment, inspection and replenishment operations. The inspection operation is performed by the client equipment maintenance personnel, or by the technical personnel of our company.
Routing maintenance of equipment is the basis of maintenance at all levels, which is directly related to operation safety, energy consumption, and service life of parts. Routine maintenance operations are carried out by equipment operators. The contents of the operation center are mainly cleaning, replenishment, safety and inspection, and the three-inspection system system before starting, during operation, and after closing is adhered to. Check the reliability of the operating mechanism, running parts and safety protection devices, maintain the cleanliness of the whole machine and each assembly part, lubricating point must be lubricated in place, and tighten loose parts. In order to use the robot normally for a long time and prevent the occurrence of mechanical failure, it's necessary to carry out regular inspection of the manipulator. The maintenance and inspection items and cycles are as follows. Please implement it carefully.
| Work Marker | Examination | Checkpoints | Method | Check Item | Process | ||||
|---|---|---|---|---|---|---|---|---|---|
| Daily | 1 Month | 6 Month | 1 Year | 2 Year | |||||
| 1 | ♦ | Suction cups, Fixture jigs, Function | Visually | Visually | Cleaning, replacement | ||||
| 2 | ♦ | Double point combination | Visually | Visually | Drain | ||||
| 3 | ♦ | Injection molding machine connection connector, hand control cable connector. | Visually | Visually | Tidy | ||||
| 4 | ♦ | Manual emergency stop switch function | Operation complete | Operation complete | Replace | ||||
| 5 | ♦ | Hand control appearance | Visually | Visually | Cleaning maintainance | ||||
| 6 | ♦ | Electric control box fan | Visually | Visually | Cleaning maintainance | ||||
| 7 | ♦ | Guide rods, bearings, slides, rails, gears and racks | Visually | Visually | Cleaning, maintainance | ||||
| 8 | ♦ | Body | Visually | Visually | Cleaning maintainance | ||||
| 9 | ♦ | Air pressure | Visually | Visually | Adjustment | ||||
| 11 | ♦ | Belt | Visually | Visually | Adjustment | ||||
| 12 | ♦ | Rail | Visually | Visually | Oiling, cleaning | ||||
| 13 | ♦ | Piping and cables | Visually | Visually | Cleaning, replacement | ||||
| 14 | ♦ | Cylinder | Operate the solenoid valve | Operate the solenoid valve | Replace, seal | ||||
| 15 | ♦ | Air filter and components | Visually | Visually | Cleaning, replacement | ||||
| 16 | ♦ | Silencer | Visually | Visually | Cleaning, replacement | ||||
| 17 | ♦ | Vacuum generator (suction unit) | Suck air | Suck air | cleaning replacement | ||||
| 18 | ♦ | Data backup battery (Inside operation box) | Electricity meter (digital) | Electricity meter (digital) | Replacement | ||||
Note: A well conducted routine maintenance is more important than the repair of the robot after the parts broken. Keep the robots clean and well lubricated will help to prolong the life of the robotic arm and have it working safely.
14.1.1 Fixture Function Confirmation
14.1.2 Check for loose parts
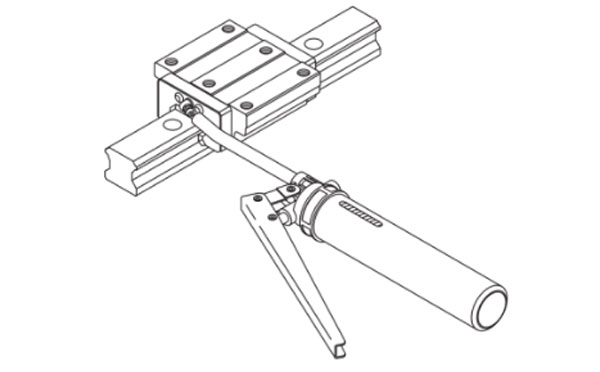
14.1.3 Maintenance of cylinder guide rod and bearing lubrication
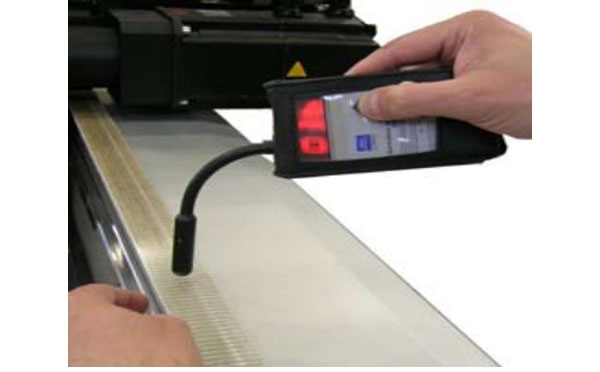
14.1.4 Lubrication and maintenance of slide rails and sliders
14.1.5 Clean and tidy appearance
14.1.6 Hydraulic shock absorber function check
14.1.7 Two-point combined maintenance
14.1.8 Check the fixture and the fixing screws of the fuselage
14.1.9 Gear
Check whether the gear clearance is normal. (if the tightening screw is loose, you need to replace the screw immediately andd make the following adjustments)
14.1.10 Timing belt
Checking whether the timing belt is good is usually judged by testing the tightness of the belt.
The specific method is as follows:
Because the fixture is used with a manipulator, it's basically in use and needs to be stopped for inspection every day. Please consult the technical service department of our company regarding the inspection method, content, handling and other related content.
| No | Model: | No.: | Department: | ||||
|---|---|---|---|---|---|---|---|
| Check Content | Inspection Requirements | Check Date | |||||
| Day 1 ~ Day 31 | |||||||
| 1 | Body | Is it clean? | |||||
| 2 | Double point combination | Whether there is standing water? | |||||
| 3 | Fixture suction cup | Is it damaged? | |||||
| 4 | Air Tube | Is it damaged or folded? | |||||
| 5 | Fixture cylinder | Whether it is damaged, no action? | |||||
| 6 | Fixture screw | Is there any loose? | |||||
| 7 | Motor connection line | Is there any loose? | |||||
| 8 | Motor running | Is there any abnormal sound? | |||||
| 9 | Slide rails, sliders, rack screws | Is there any loose? (There is a locking line) | |||||
| 10 | Surface of sliding rail and rack | Is it worn? | |||||
| 11 | Oil Supply cup | Is there have oil? | |||||
| 12 | Drive plug | Is there any loose? | |||||
| 13 | Energy chain | Whether it is worn or deformed | |||||
| Checker: | |||||||
| Remarks: Carry out spot inspection according to the above requirements, and submit it to the equipment section for archiving after one month. Inspection symbols: Intact:"√"; pending repair: "x"; other "O"; | |||||||
| Total | Type | Time | Uplanned downtime records | ||||
| Reason and time of dowwntime | |||||||


Contact SWITEK IML
sales06@switek.biz
+86 186 5927 5869

DongGuan, GuangDong, China
HuangYanZheng©Copy Right